Wednesday, April 08, 2009

More On MarsEdit And Text Styles

In my previous post on Ecto I said that it was not possible to have differing text styles in MarsEdit but I now have to refute that claim. It is of course possible, if not readily apparent how to achieve it. To do this you have to create the HTML mark up text yourself using the Markup editor. Once you have done so it is a simple matter of entering some text and then applying the style that you have created as in this example. Not as easy to achieve as in Ecto but it does work. The HTML used to turn the selected text to Comic Sans is as follows:
    <span style="font-family: 'Comic Sans MS';"></span>
By creating the opening markup with an 'asktext' directive you can enter the name of the font family at the time that you apply the style as I have done here, below is what the opening markup looks like.
    <span style="font-family: '#asktext Enter Text:#';">
This is fine as long as you know the name of the font you want to use! I don't really use too many different fonts so it will not be a problem for me to create separate styles for the ones I use.

Thursday, March 12, 2009

Ecto

Not too dissimilar to MarsEdit in it's look and feel. It was initially a little more complicated to set up the accounts, certainly for Blogspot, but not too bad.

I have noticed that occasionally it seems to do funny things in formatting, but that might just be me. It also seems to have issues with categories, doesn't always retrieve them from the blogs or create new ones when asked to.

It is pretty good at formatting text, for instance this bit of text is in Comic Sans MS, whereas the rest is in Arial. In MarsEdit you can't seem to mark individual portions of text just the complete article.

Inserting pictures from Flickr is pretty simple, or so I thought, you just use the Flickr Helper addon, however today that doesn't appear to be working, in that it is not allowing me to get to any of my photos even though it is displaying their names (not the thumbs though). None of the editor toolbar formatting buttons appear to be working anymore either, maybe the demo license has expired, it certainly hasn't nagged me and formatting from the menu still appears to work!

The more I test these applications the more holes I appear to find! This post, without a photo was posted using Ecto.

OK, I can put a Flickr picture in by hand, so here is one of Fountains Abbey in North Yorkshire.

North Yorkshire -IMG_0166

More on Blog Software

Blogo

Just did a copy and paste in Blogo and of the previous Blogo post and found that although I did a cmd A to select all the text when I pasted the text back into a new post window the paragraph after the picture (and the picture) were not pasted. Doing a paste into an external application did paste everything in (except the picture and the bulleted list was pasted but not visible). If you copy the raw HTML you can paste it back as long as you are in the HTML window. If you try and paste it into the normal editing window it tries to import the image. Their copy and paste really does have some issues!

MarsEdit

In MarsEdit there is no HTML editor as such but you can add HTML markup tags from the tool bar dropdown or from the context sensitive menu directly into your post. These show up in blue. All formatting is done this way so you do need to be comfortable with seeing markup tags in the editor. There are not that many tags provided as standard but you can easily add your own by selecting Edit.... from the Markup menu. I found that I had to add a couple of extra tags in order to be able to do bulleted lists (which in Blogo are provided by just clicking a button). Theses are the 2 tags that I had to add:
  • ul tag to create the list
  • li tag to create each item
It works.

Wednesday, March 11, 2009

MarsEdit

This post will be very similar to the previous post, I'll use a different picture of course but otherwise it really just mirrors the previous one to see how easy MarsEdit is. The interface is not as simple as the Blogo one, having said that it is not as quirky either. It is much more of what I would call a standard Mac style interface. The main window is a bit like Mail or Thunderbird. The editor fairly standard though there is a second window which provides a dynamic preview of the post that is being created in the editor window. You can close the window if it starts to get really annoying! Well let's see how easy it is to drop a Flickr picture in then! IMG_0448 
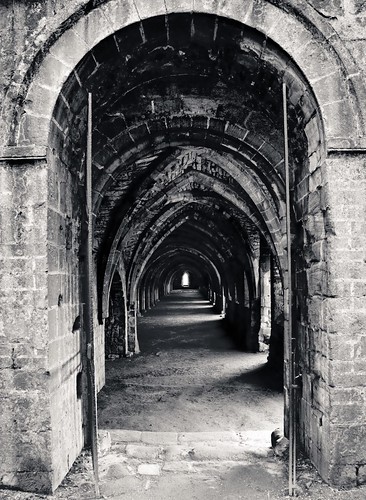
That was about as easy as it gets, click Media, select the Flickr tab (the first time you do this it will open your browser to get Flickr authorisation, when you have done that just click Verify to continue), select your photo, job done. So here goes, let's post it!

Blogo

Well, I'm testing various blogging software for the Mac to see which one will be the one I end up using on a permanent basis.

At present I am trying 3 different ones:

  • Ecto
  • MarsEdit
  • Blogo

I have been using Ecto for a few days and it isn't too bad though it does have a few quirks, but then I think all of them will have. I also tried iBlog but gave up more or less straight away when I couldn't find where to define the blog site! Might be that it does not support direct connection.

This is the first post using Blogo. The initial setup was very easy just clicked on the Blogspot icon, changed 'mysite' to 'photolouis', entered the user ID and password and that was it.

The editor is pretty simple and uncluttered, though fairly basic. There appears to be no HTML Tag highlighting when in HTML edit mode, which may not be an issue if you never want to edit raw data.

Now I need to be able to link to an image on Flickr, so how easy is that going to be I wonder?

Well that was really not that easy. When you go through the insert process using the bookmarklet all appears well until you post and then Blogo tries to upload the photo to Picasa, not quite what I had in mind! A bit of a Google and I found this post, unfortunately that didn't appear to work for me, all I could do was paste the Flickr HTML directly into the HTML editor, not a show stopper just a right royal pain! Have emailed support and will see what response we get back.

Other than that not too bad so far.


Thursday, March 05, 2009

Split The Blog!

For a while now I have been thinking of splitting my original blog as the posts that I've been making really don't fit the blog. It should be concentrating on my photography but instead I appear to be posting nothing but recipes, no wonder I'm so fat! Today I eventually bit the bullet today.

Voila - ChezLouis is officially launched! So much so that the champagne is still flowing down the iMAC and there is broken glass all over my desk. Better get that cleaned up before Steph gets back.

I have also created a new PhotoLouis blog.

I just hope with all these blogs that I will find enough time, and subject matter, to actually use them!

Wednesday, March 04, 2009

Butternut Squash Soup

This is a simple butternut squash which I came up with today. It takes less than an hour to make, depending on how quick you are at peeling the vegetables! Sorry but there are no photos today, didn't have the time.

Ingredients:

1 Butternut Squash 1 Onion Cayenne Pepper to taste Ground Cinnamon to taste Nutmeg Salt & Black Pepper Mixed Herbs to taste Olive Oil Water White Wine (optional) Creme Fraiche (optional)

  1. Peel and chop the onion, place in a saucepan with a little olive oil. Heat until the onion goes soft and translucent.
  2. Peel the squash and remove the seeds. Chop in to smallish pieces, this is one time when size doesn't matter, and add to the saucepan.
  3. Just let the squash absorb some of the oil that is still in the saucepan and then add some boiling water. The amount will depend on the size of the saucepan and the size of the squash. You don't need to completely cover the squash, but you will need to ensure that the liquid does not completely evaporate otherwise the soup will burn!
  4. Add some cayenne pepper to give a bit of a kick (it doesn't take a lot!), salt, pepper, ground nutmeg and some ground cinnamon (this helps to control the kick!). Add some mixed herbs if you like to enhance the flavour.
  5. Simmer until the squash is cooked. Don't be afraid to add a bit more liquid during the cooking if it needs it. You could always add a bit of white wine instead of water (or as well as). I tend to use a wooden spoon to stir the soup as it is cooking and when I can start to squash the squash it is ready.
  6. Now you need to liquidise the soup. There are several ways you can do this, a blender, hand mixer, hand blender or even the wooden spoon. I tend to use the small electric hand blender as I can just blend the soup in the saucepan.
  7. Stir in a dollop of creme fraiche if you want the soup to be a bit creamier.
You may have noticed that I don't add any extra stock, just the water that is used to cook the vegetables, there really is no need. When adding the liquid, don't over do it or you will end up with a very thin soup. It is better to add the liquid a little at a time, I normally ensure that to start with the vegetables are at least a third to a half covered. I normally serve this with freshly baked rolls.

Monday, February 16, 2009

Salmon and Broccoli Bake

IMG_0430 Originally uploaded by PhotoLouis
A recipe for a quick salmon and broccoli bake. Click on the photo to view a pictorial version of the recipe. Ingredients: Salmon - flaked Broccoli Florets Onion Mushrooms Creme Fraiche White Wine Olive Oil Salt & Pepper First steam the broccoli until tender. Then transfer to a roasting dish. Dice an onion, a few mushrooms and gently brown in some olive oil. Add some white wine so that there is some liquid in the pan. If you prefer not to use alcohol just put in a bit of stock, or other liquid of your own choice. Grate some cheese and add it to the pan. I find that it is best to use a mixture. Stronger cheeses and blue cheeses are always good. Here I used some old strong cheese, cheddar and parmesan. Stir in some creme fraiche. A couple of table spoons is enough. Spray a little olive oil on some salmon pieces, sprinkle with salt, pepper and some fennel seeds. Wrap in tin foil and place in a hot oven for 10-12 minutes, or until nice and soft. Don't over cook the salmon as it is going back in the oven! I normally set the oven to about 180. Once the salmon is nice and tender take it out of the oven and flake it. Mix the salmon in with the broccoli in the baking tray. Add the liquid from the pan so that it spreads over all the broccoli and salmon. Sprinkle some more grated cheese over the dish and put in a hot oven for 10-20 minutes. I normally set the oven to about 180. The finished result plated with some Austrian style red cabbage and all ready to eat!

Friday, February 13, 2009

Snow

img102 Originally uploaded by PhotoLouis
So for the past couple of weeks we have seen the worst snow in decades and as normal everything came to a stand still. This is obviously 'Global Warming' at it's worst, it's irrelevant that we are in the middle of winter! So just to bring us back to a sense of reality have a look at how it was back on January 10th, 1968 in Whetstone, North London.